Monday, 30 May 2022

Remove ns0 from BizTalk mapper / XSLT output

When using BizTalk mapper to do transformation, you might come across the output XML with ns0 in the root tag. To remove this, you may remove the "Target Namespace" of the schema itself.

Double click on the schema file and under properties window, remove the value in "Target Namespace".


Friday, 3 August 2018

FirstOnly in datasource and its alternative (using ROW_NUMBER())

When there’s a requirement to retrieve only the first record from datasource, we might think the “FirstOnly” property under the datasource table will comes in handy, but unfortunately it doesn’t.

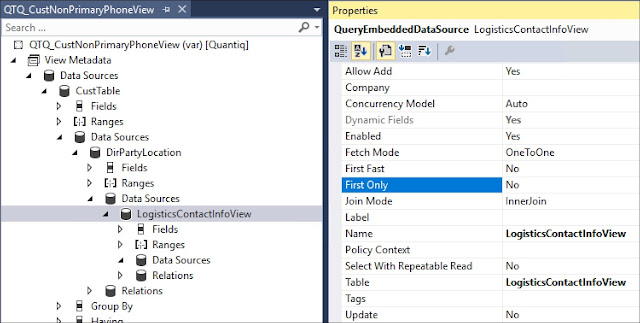
I’ve created a View and set the datasource’s FirstOnly property to Yes, then created a class to select from this View, it still returns all the records.
Not sure how this property works, but that’s not the focus of this article.

Screenshot showing the “FirstOnly” property


As an alternative, we can create an additional field (RowNumber) and filter it using RowNumber = 1.

Eg. Given the sample tables below, the requirement is to shows only one contact number for the customer.

Customer
Contact
AccountNum
AccountNum
Locator
ABC
ABC
12345
DEF
ABC
34567
DEF
56789
DEF
78901
DEF
90123

We’ll start with creating the View method under the View.

public class QTQ_CustNonPrimaryPhoneView extends common
{
    public static server str rowNumByAccountNum()
    {
        return 'ROW_NUMBER() OVER (PARTITION BY T1.Partition, T1.AccountNum ORDER BY AccountNum)';
    }
}

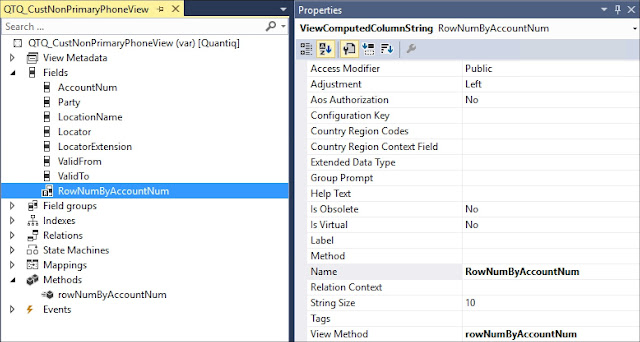
Then create a String computed column, set the View Method with this method name.


Select from this View will product result as shown below.

AccountNum
Locator
RowNumByAccountNum
ABC
12345
1
ABC
34567
2
DEF
56789
1
DEF
78901
2
DEF
90123
3

You can easily filter it with “RowNumByAccountNum = 1” to retrieve only the first contact.

Eg.
When using it in code
select from QTQ_CustNonPrimaryPhoneView where QTQ_CustNonPrimaryPhoneView.RowNumByAccountNum = 1.

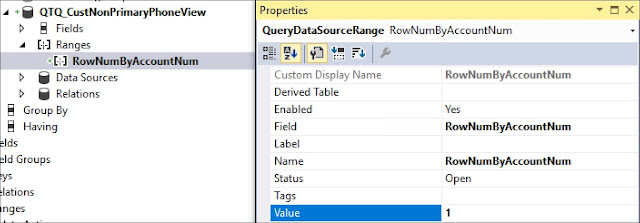
When using it in Query/View, set the Range by putting in the field ‘RowNumByAccountNum’ and set the value to 1


Monday, 25 June 2018

SFTP setup and Logic App testing

A short article regarding setting up an SFTP for testing.

It covers:
  • Rebex Tiny SFTP Server
  • Add inbound/outbound rules in Windows Firewall
  • Add inbound/outbound port rules in VM Networking
  • Setup Inbound NAT rules in Azure load balancer
  • Configure Logic App SFTP connection


Rebex Tiny SFTP Server
In my case, I’m using Rebex Tiny SFTP Server (Free) and running it in Azure hosted VM.
You may download it from: https://labs.rebex.net/tiny-sftp-server

It doesn’t requires installation, just download and unzip it.
You may change the username, password, and root directory in the config file “RebexTinySftpServer.exe.config”.


Windows Firewall

Before running the application (RebexTinySftpServer.exe), we’ll need to get the ports opened.

Inbound rules for SFTP

Outbound rules for SFTP


Azure networking

Go to: Virtual machines (select the VM) > Networking
  • Add inbound port rule
  • Add outbound port rule


Load balancer

Go to: : Virtual machines (select the VM) > Overview
Click on the link under the “DNS name”, take note of the name of the load balancer in the Configuration screen.


Go to: Load balancer (Select the load balancer as you’ve taken note of in previous step) > Settings > Inbound NAT rules


Add the SFTP rule

Run the Rebex Tiny SFTP Server and try connect to it using your SFTP client (Eg. FileZilla).
Confirm it is working before testing your Logic App.


Configure Logic App SFTP connection

You may configure Logic App SFTP connection for testing.
Below is an example of the screen creating the SFTP connection (Replace the value in the Connection Name, Host Server Address, and User Name as setup in your Rebex Tiny SFTP server).

You can then test create file via the SFTP connection you’ve just setup


Friday, 13 April 2018

Object Server Azure: Exception 3762504530 occurred in session 2, process: w3wp.exe, thread: 6396 (After restore Azure db to local VM)

Ref: https://docs.microsoft.com/en-us/dynamics365/unified-operations/dev-itpro/database/copy-database-from-azure-sql-to-sql-server

While trying to update local Dynamics 365 VM to use a database backup from Azure environment, I'm getting the error "Object Server Azure: Exception 3762504530 occurred in session 2, process: w3wp.exe, thread: 6396". This happens after I rename the database and start up the services again.

What happens is that the *.bacpac file has not been prepared for SQL Server yet, it is a direct backup of the Azure SQL database.

In ref. link above, one of the step is to prepare the database which include an important settings changes:

update sysglobalconfiguration set value = 'SQLSERVER' where name = 'BACKENDDB'

This statement will prepare the database for SQL Server environment.
To resolve this issue, run the script under the "Prepare the database" section (in the ref. link above), then restart the services again.

Before the error is resolved, if you're running the Admin user provisioning tool, you'll get "Time out has expired and the operation has not been completed" error.


Below is the screenshot from Event Viewer for the error in title

------------------------------------------------
The description for Event ID 180 from source Dynamics Server Azure cannot be found. Either the component that raises this event is not installed on your local computer or the installation is corrupted. You can install or repair the component on the local computer.

If the event originated on another computer, the display information had to be saved with the event.

The following information was included with the event:

Object Server Azure:
Exception 3762504530 occurred in session 2,process: w3wp.exe ,thread: 6396


------------------------------------------------

Tuesday, 3 April 2018

Biztalk mapper and Functoid (columns to rows tranformation)

This article demo the use of Table Looping and Table Extractor functoid to transform columns to rows. The scenario is there's a source schema which has 3 dates fields. These dates needs to be transformed into rows in the destination schema. A date type field in the destination schema will indicate the purpose of the date (Eg. An enum value).

1. Create an Integration Account project


2. Add the source and destination schema
3. Add a new Map


4. Open the map and select the source and destination schema
5. Add a "Table Looping" functoid to the grid
6. Drag the parent node to the functoid to connect them


7. Double click on the "Table Looping" functoid in the grid and enter the number of columns to generate (In my example, 2)


8. Then drag all the date fields to the table looping functoid
    *Double click on it will shows the input as shown below.


9. In my scenario, I'll need date type, so I'll be adding in 3 constant value as the date type (POD, DLD, DCD)


10. Click on the "Table Looping Grid" in the screenshot above and set the rows, then click "OK" to close it


11. Drag a line from the "Table Looping" functoid to the parent node of the date


12. Drag 2x "Table Extractor" functoid to the grid
13. Drag a line from the "Table Looping" functoid to the first "Table Extractor" functoid. Then drag another line from the "Table Looping" functoid to the second "Table Extractor" functoid.
14. Drag a line from first "Table Extractor" functoid to the "DateType" field.
15. Drag a line from the second "Table Extractor" functoid to the "DateValue" field.
      It should now looks like the screenshot below.


16. Double click on the first "Table Extractor" functoid and set "1" as shown in screenshot below.
This value indicate the table extractor should extract the 1st column in the Table Looping output. In our example, it extract the first column from the Table Looping functoid and map it to DateType.
Do the same setup to the second "Table Extractor" functoid by setting it to "2" (which indicate it should extract the 2nd column from the Table Looping output, which eventually mapped to "DateValue")


17. Run a test on the map with a sample input XML as shown in the screenshot below


18. The output will be as shown in the screenshot below


Tuesday, 6 March 2018

Error - You are not authorized to access table '' (). Contact your system administrator.

When getting this error "You are not authorized to access table '' (). Contact your system administrator.", two of the possible reasons would be:
  1. The configuration key for the table is not enabled (Check it under System administration > Setup > Licensing > License configuration)
     
  2. The View does not have any field (Expand the "Field" node under the View to check it)

Tuesday, 23 January 2018

Default model when create Dynamics 365 project

A quick tips on how to set default model in Dynamics 365.

The default model for the VM is Fleet Management, this can be a bit annoying each time you create a new project, it default to this model and have to open up the project properties to change it.


To change the default model:

1. Open the config file located at: C:\Users\\Documents\Visual Studio 2015\Settings\DynamicsDevConfig.xml


2. Change the ‘DefaultModelForNewProjects’ element value to ‘YourModelName’ and save the file


There're other options you can set here, one of the useful one will be the , set this to "true" if you want the "Synchronize Database on Build" default to true.

Monday, 16 October 2017

Create new entity error - The natural key for the table CustPackingSlipTrans was not found

When create new entity for D365, the wizard will prompt developer to select the table name, the rest is just the matter of selecting fields and finish off the wizard. But sometimes we'll get error for table without a Replacement key.

Eg. CustPackingSlipTrans.

Unfortunately you can't change the "Replacement key" for standard table unless you "Customize" it.
Table extension doesn't allow the change of this property either.

If you use the wizard to create entity for CustPackingSlipTrans, you'll get the "The natural key for the table CustPackingSlipTrans was not found" error.


To create the entity for this table, there're two choices:

  1. Manually create them (including the child datasources)
  2. Temporarily "Customize" it, then remove the "Customize" element after the entity is created


Below are the steps for Option 2 (less effort and quicker than Option 1).
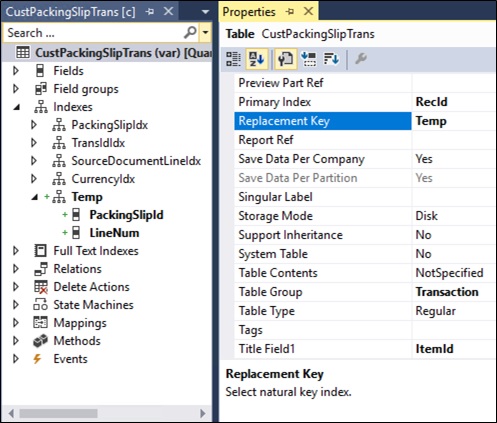
1. Create a temporary index at CustPackingSlipTrans

Allow Duplicates = No
Alternate Key = Yes


*NOTE: Do not include RecId in the temp index

2. Set the temporary index as Replacement key


3. Create the new entity (Right click on the project > Add > New item > Data Model > Data entity)

4. At the wizard, select "CustPackingSlipTrans" as Primary datasource


5. Click "Next", select the required fields and finish off the wizard


6. After the new entity is created, delete the "Customized" CustPackingSlipTrans

7. Update the EntityKey with other key field that's appropriate
(If Data Management property has been set to Yes, then update the staging table as well)


Wednesday, 26 July 2017

Data Management Entity export for all companies

In D365O, by default if you create an entity for a company specific table, the "Primary Company Context" property is set to DataAreaId. This affect what data is exported when the Entity is used for exporting data.

Eg.
All rows from table AAA_TestTable.

AAA_TestTable entity where the "Primary Company Context" property is set to "DataAreaId".
NOTE: The "CompanyId" field is mapped to "DataAreaId" of the source table.

When an Export job is setup using this Entity, it will export the rows base on the company context.

Eg.
Current company = USMF, then only records from USMF company is exported.

If the "Primary Company Context" is cleared out (empty), it will export all records regardless of the company.

Eg.
It exported all records regardless of the company context.


If the Entity is used through OData service call, then the above changes is not required to make the data export cross-company. It just need to add the "cross-company=true" parameter to the service URL. Eg. https://demoaos.cloudax.dynamics.com/data/AAA_TestTable?cross-company=true.

For more details, refers to https://docs.microsoft.com/en-us/dynamics365/unified-operations/dev-itpro/data-entities/cross-company-behavior

Friday, 14 July 2017

DIXF - System.Security.Cryptography.CryptographicException: Key not valid for use in specified state

Had this error each time we replaced the business database in our Test environment.

It occur at the Data Import Export Framework > Setup > Source data format > Validate (button).

Took a quick look at the code which causes this error, it came from \Data Dictionary\Tables\DMFDataSourceProperties\Methods\validateConnectionString - Ln 49, on the statement "cryptoblob2str(WinAPIServer::cryptUnProtectData(_dmfDataSourceProperties.Password))".

It is trying to decrypt data that's encrypted from another environment, which will cause error in this case. The "Password" field in the table is storing the encrypted data. Our setup is to use "System DSN " from the "AOS", so there're two way for us to fix it:
1. Clear the "Password" field from back-end (Eg. DMFDataSourceProperties.Password = conNull(); DMFDataSourceProperties.update();)
2. Delete the existing record and create a new one with the exact same setup

It works in our case due to we just need this field to be empty as it won't be used.


Detail error message
System.Reflection.TargetInvocationException: Exception has been thrown by the target of an invocation. ---> System.Security.Cryptography.CryptographicException: Key not valid for use in specified state.
   at System.Security.Cryptography.ProtectedData.Unprotect(Byte[] encryptedData, Byte[] optionalEntropy, DataProtectionScope scope)
   --- End of inner exception stack trace ---
   at System.RuntimeMethodHandle.InvokeMethod(Object target, Object[] arguments, Signature sig, Boolean constructor)
   at System.Reflection.RuntimeMethodInfo.UnsafeInvokeInternal(Object obj, Object[] parameters, Object[] arguments)
   at System.Reflection.RuntimeMethodInfo.Invoke(Object obj, BindingFlags invokeAttr, Binder binder, Object[] parameters, CultureInfo culture)

   at Microsoft.Dynamics.AX.ManagedInterop.ClrBridgeCore.InvokeClrStaticMethod(Char* pszClassName, Char* pszMethodName, Char* assemblyName, Int32 argsLength, ObjectWrapper** arguments, Boolean* argsAreByRef, Boolean* isException)

Sunday, 9 July 2017

Error - The field 'FieldName' on the extension 'ExtensionName.Extension' already exists. This extension cannot be applied to the base element.

In a recent D365O development, I came across this error when moving fields from a model to another model.

The field 'FieldName' on the extension 'ExtensionName.Extension' already exists. This extension cannot be applied to the base element.

The scenario is that while doing testing on development, some fields have been moved to the standard element (overlayered it by "Customize") [Eg. This is in ModelA]. When the test is done, these field are then moved back to the extension [Eg. This is in ModelB]. Unfortunately after moved it back to the extension, this error occur during the build of the solution.

This is what has been derived:
  • When the fields are moved to the base element, a build is done and the assembly is updated
  • After the testing is done, the change on the base element is deleted (deleting the whole overlayered element)
  • Then used the "Get latest" to restore the extension (it is where the fields are originally created)
  • Then build solution again and error occur
  • It is suspected that after the change in base element is deleted, the reference to the assembly still there. Hence, when building the solution of the extension, it found that the same fields already exist in the base element.

Solution
  1. In Visual Studio, go to Dynamics 365 > Build models
  2. Select only the model where the base element sit (Eg. Application suite)
  3. Build it
  4. Then build the solution again

Wednesday, 3 May 2017

D365 - You are not authorized to login with your current credentials

If you're restoring Dynamics 365 for Operation database with a backup from another environment, one of the error you might get is "You are not authorized to login with your current credentials. You will be redirected to the login page in a few seconds.".


To fix that, you just need to rerun the "AdminUserProvisioning" tool again.
If you're still getting the error after running the provisioning tool, check the event log.

One of the possible cause would be this database from another environment hasn't been sync with your environment yet, hence, giving some error of this or that field is not found, etc.
Try synchronize the DB, then do an iisreset.


Tuesday, 21 February 2017

Ineffective execution plan due to outdated statistics

Recently encounter a performance issue where the query plan generated is ineffective due to outdated statistics.

  1. There'a batch job periodically updating a table (recurrence job) based on the daily activities on another table
  2. External call from web - calling a stored proc and executed a query (generated the execution plan and cached it)
  3. One of the occurrence has made large number of record update but not large enough to hit the threshold to trigger statistic update
  4. External call from web - calling the same stored proc
  5. Due to the large update on #3 has cause the data changes, the query plan no longer effective
  6. The query in the stored proc is running extremely long

TableA: ~16m records
TableB: ~1m records
TableC: ~100k records
TableD: ~10k records
TableE: ~5 records

The query in the stored proc is joining a few table (Eg. TableA - E), one of the table always has very few records (between 1 to 10), on normal circumstances, the query always generated a query plan which join TableE first to other table so that it reduce the number of records required on the next join to the rest of the table.

But somehow the first run of the stored proc has generated a query plan which use TableC as first join, joining it to TableA, then to TableB, TableD, and TableE. This appear to be correct on that run itself due to the parameter value passed in does run (slightly) better with this plan. But the next time when it run, unfortunately the previously cached plan is bad for that parameter, it has cause the query run much longer.

TableE is specifically designed to reduce the join operation, but unfortunately on the bad query plan, it put it to the last join operation, hence doing a lot of unnecessary join.

The solution we put in is to make the TableE join with TableA as subquery.
All other join has where condition which correlated to TableA, so this will make the subquery being executed first, this then achieve our initial purpose, to ensure the join order always has the TableE first, then the rest of the order does not matter, they can be join as SQL optimizer feel appropriate.