Friday 3 August 2018

FirstOnly in datasource and its alternative (using ROW_NUMBER())

When there’s a requirement to retrieve only the first record from datasource, we might think the “FirstOnly” property under the datasource table will comes in handy, but unfortunately it doesn’t.

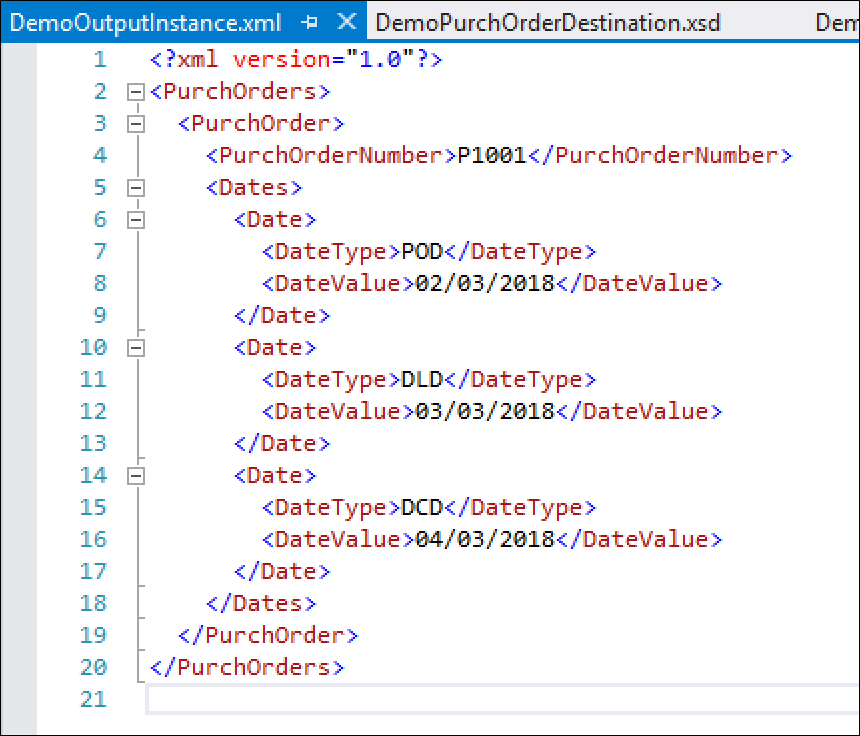
I’ve created a View and set the datasource’s FirstOnly property to Yes, then created a class to select from this View, it still returns all the records.
Not sure how this property works, but that’s not the focus of this article.

Screenshot showing the “FirstOnly” property


As an alternative, we can create an additional field (RowNumber) and filter it using RowNumber = 1.

Eg. Given the sample tables below, the requirement is to shows only one contact number for the customer.

Customer
Contact
AccountNum
AccountNum
Locator
ABC
ABC
12345
DEF
ABC
34567
DEF
56789
DEF
78901
DEF
90123

We’ll start with creating the View method under the View.

public class QTQ_CustNonPrimaryPhoneView extends common
{
    public static server str rowNumByAccountNum()
    {
        return 'ROW_NUMBER() OVER (PARTITION BY T1.Partition, T1.AccountNum ORDER BY AccountNum)';
    }
}

Then create a String computed column, set the View Method with this method name.


Select from this View will product result as shown below.

AccountNum
Locator
RowNumByAccountNum
ABC
12345
1
ABC
34567
2
DEF
56789
1
DEF
78901
2
DEF
90123
3

You can easily filter it with “RowNumByAccountNum = 1” to retrieve only the first contact.

Eg.
When using it in code
select from QTQ_CustNonPrimaryPhoneView where QTQ_CustNonPrimaryPhoneView.RowNumByAccountNum = 1.

When using it in Query/View, set the Range by putting in the field ‘RowNumByAccountNum’ and set the value to 1


Monday 25 June 2018

SFTP setup and Logic App testing

A short article regarding setting up an SFTP for testing.

It covers:
  • Rebex Tiny SFTP Server
  • Add inbound/outbound rules in Windows Firewall
  • Add inbound/outbound port rules in VM Networking
  • Setup Inbound NAT rules in Azure load balancer
  • Configure Logic App SFTP connection


Rebex Tiny SFTP Server
In my case, I’m using Rebex Tiny SFTP Server (Free) and running it in Azure hosted VM.
You may download it from: https://labs.rebex.net/tiny-sftp-server

It doesn’t requires installation, just download and unzip it.
You may change the username, password, and root directory in the config file “RebexTinySftpServer.exe.config”.


Windows Firewall

Before running the application (RebexTinySftpServer.exe), we’ll need to get the ports opened.

Inbound rules for SFTP

Outbound rules for SFTP


Azure networking

Go to: Virtual machines (select the VM) > Networking
  • Add inbound port rule
  • Add outbound port rule


Load balancer

Go to: : Virtual machines (select the VM) > Overview
Click on the link under the “DNS name”, take note of the name of the load balancer in the Configuration screen.


Go to: Load balancer (Select the load balancer as you’ve taken note of in previous step) > Settings > Inbound NAT rules


Add the SFTP rule

Run the Rebex Tiny SFTP Server and try connect to it using your SFTP client (Eg. FileZilla).
Confirm it is working before testing your Logic App.


Configure Logic App SFTP connection

You may configure Logic App SFTP connection for testing.
Below is an example of the screen creating the SFTP connection (Replace the value in the Connection Name, Host Server Address, and User Name as setup in your Rebex Tiny SFTP server).

You can then test create file via the SFTP connection you’ve just setup


Friday 13 April 2018

Object Server Azure: Exception 3762504530 occurred in session 2, process: w3wp.exe, thread: 6396 (After restore Azure db to local VM)

Ref: https://docs.microsoft.com/en-us/dynamics365/unified-operations/dev-itpro/database/copy-database-from-azure-sql-to-sql-server

While trying to update local Dynamics 365 VM to use a database backup from Azure environment, I'm getting the error "Object Server Azure: Exception 3762504530 occurred in session 2, process: w3wp.exe, thread: 6396". This happens after I rename the database and start up the services again.

What happens is that the *.bacpac file has not been prepared for SQL Server yet, it is a direct backup of the Azure SQL database.

In ref. link above, one of the step is to prepare the database which include an important settings changes:

update sysglobalconfiguration set value = 'SQLSERVER' where name = 'BACKENDDB'

This statement will prepare the database for SQL Server environment.
To resolve this issue, run the script under the "Prepare the database" section (in the ref. link above), then restart the services again.

Before the error is resolved, if you're running the Admin user provisioning tool, you'll get "Time out has expired and the operation has not been completed" error.


Below is the screenshot from Event Viewer for the error in title

------------------------------------------------
The description for Event ID 180 from source Dynamics Server Azure cannot be found. Either the component that raises this event is not installed on your local computer or the installation is corrupted. You can install or repair the component on the local computer.

If the event originated on another computer, the display information had to be saved with the event.

The following information was included with the event:

Object Server Azure:
Exception 3762504530 occurred in session 2,process: w3wp.exe ,thread: 6396


------------------------------------------------

Tuesday 3 April 2018

Biztalk mapper and Functoid (columns to rows tranformation)

This article demo the use of Table Looping and Table Extractor functoid to transform columns to rows. The scenario is there's a source schema which has 3 dates fields. These dates needs to be transformed into rows in the destination schema. A date type field in the destination schema will indicate the purpose of the date (Eg. An enum value).

1. Create an Integration Account project


2. Add the source and destination schema
3. Add a new Map


4. Open the map and select the source and destination schema
5. Add a "Table Looping" functoid to the grid
6. Drag the parent node to the functoid to connect them


7. Double click on the "Table Looping" functoid in the grid and enter the number of columns to generate (In my example, 2)


8. Then drag all the date fields to the table looping functoid
    *Double click on it will shows the input as shown below.


9. In my scenario, I'll need date type, so I'll be adding in 3 constant value as the date type (POD, DLD, DCD)


10. Click on the "Table Looping Grid" in the screenshot above and set the rows, then click "OK" to close it


11. Drag a line from the "Table Looping" functoid to the parent node of the date


12. Drag 2x "Table Extractor" functoid to the grid
13. Drag a line from the "Table Looping" functoid to the first "Table Extractor" functoid. Then drag another line from the "Table Looping" functoid to the second "Table Extractor" functoid.
14. Drag a line from first "Table Extractor" functoid to the "DateType" field.
15. Drag a line from the second "Table Extractor" functoid to the "DateValue" field.
      It should now looks like the screenshot below.


16. Double click on the first "Table Extractor" functoid and set "1" as shown in screenshot below.
This value indicate the table extractor should extract the 1st column in the Table Looping output. In our example, it extract the first column from the Table Looping functoid and map it to DateType.
Do the same setup to the second "Table Extractor" functoid by setting it to "2" (which indicate it should extract the 2nd column from the Table Looping output, which eventually mapped to "DateValue")


17. Run a test on the map with a sample input XML as shown in the screenshot below


18. The output will be as shown in the screenshot below


Tuesday 6 March 2018

Error - You are not authorized to access table '' (). Contact your system administrator.

When getting this error "You are not authorized to access table '' (). Contact your system administrator.", two of the possible reasons would be:
  1. The configuration key for the table is not enabled (Check it under System administration > Setup > Licensing > License configuration)
     
  2. The View does not have any field (Expand the "Field" node under the View to check it)

Tuesday 23 January 2018

Default model when create Dynamics 365 project

A quick tips on how to set default model in Dynamics 365.

The default model for the VM is Fleet Management, this can be a bit annoying each time you create a new project, it default to this model and have to open up the project properties to change it.


To change the default model:

1. Open the config file located at: C:\Users\\Documents\Visual Studio 2015\Settings\DynamicsDevConfig.xml


2. Change the ‘DefaultModelForNewProjects’ element value to ‘YourModelName’ and save the file


There're other options you can set here, one of the useful one will be the , set this to "true" if you want the "Synchronize Database on Build" default to true.